

Background
In this post I am going to walkthrough how you can get, and install the Oracle ZFS Storage Appliance simulator on VirtualBox. I will then share how we can create an NFS filesystem and configure SNMP to support HCC (Hybrid Columnar Compression).
Download OVA
Start by downloading the 3.4GB Oracle Storage Appliance Simulator software by following the link here and accepting then Oracle licence Agreement.

Once the download is complete you should have an OS8.8VirtualBox.ova file available for use.
Installing the Virtual Machine
From VirtualBox navigate to File -> Import Appliance and select the OVA file from your download folder.
If you have enough resources, edit the RAM setting and set the Machine Base Folder to your preferred folder, I am using an external SSD drive with the VM sized to 4GB.

Click on ‘Import’, and be patient it can take quite a while for the VM and all the VirtualBox VDI files to be created.

Before we start our new Virtual Machine, let’s make a few more adjustments.
The VirtualBox image requires the Oracle VirtualBox extensions to installed for USB2.0 support, if your not licensed you can remove USB2.0 support from the VM by navigating to Settings -> Ports -> USB and turning off ‘Enable USB Controller’

I also updated the Video Contoller settings Setting -> Display changing the Graphics Controller from VMsVGA to VMSVGA.

Starting ZFSA Virtual Machine
Watch the console whilst the VM boots and once up provide:

- Host Name
- DNS Domain name
- IP Address
- IP Netmask
- Default Router
- DNS Server
- Password for your ‘root’ Super-User.
Once the initial configuration is complete you can use your browser to configure your ZFS Storage Appliance simulator using the link in the console and the password you just provided.
Initial Configuration
If all has gone well you should be presented with the Oracle ZFS Storage VirtualBox Welcome Screen.

Configure Networking
Now walkthrough the wizard, confirm the networking values and hit ‘COMMIT’.

Configure DNS
Click ‘COMMIT’ to use the DNS values provide during the initial boot.

Configure Time
Again, hit ‘COMMIT’ to use the default NTP settings.

Configure Name Services
And finally, hit ‘Commit’, to take the default Name Services.

Configure Storage
We can now set up our Storage Pool by clicking on the ‘+’

Update Data Devices to see all 15 VirtualBox VDI devices, and ‘COMMIT’.

Select the most appropriate Storage Profile for your use, as I will only be using this on my MacBook Pro I will select ‘Striped’ as data protection is not a concern, but I want maximum Performance and Capacity.

The ZFS Appliance will now present a Storage Profile summary screen.

Registration & Support
Enter your MOS details or click ‘LATER’ if you prefer, and confirm.

We can now configure any required Services, LUNS and / or filesystems

NFS Filesystem
Select ‘Configure filesystems or LUNs’

Click on the ‘+’ to create a new Filesystem (NFS Share), provide Name, User, Group and Permissions. e.g.


As I am going to be using this share for my Oracle 19c database I need to configure the storage to use the same block size as my database.
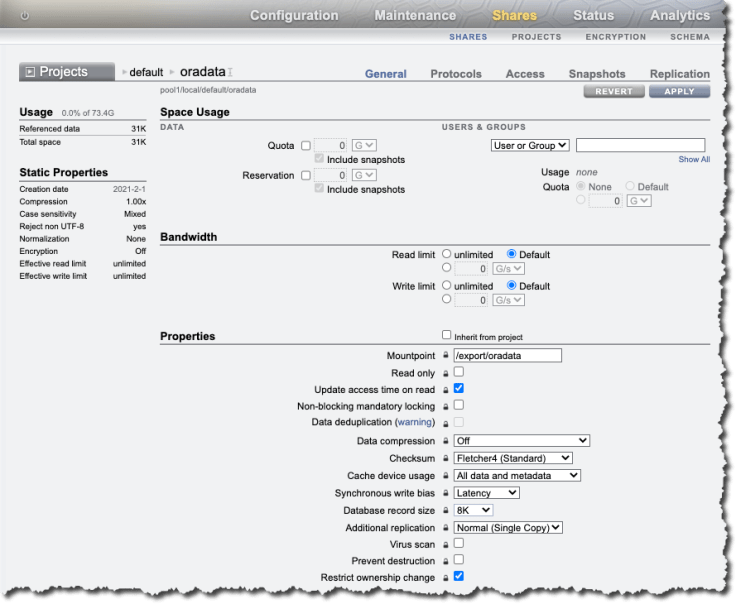
Select the filesystem and turn-off ‘Inherit from project’ and update the Database record size to 8K in the Properties section.
SNMP (Simple Network Management Profile)
As I plan to use the ZFS Storage VM to allow my Oracle 19c database to use HCC (Hybrid Columnar Compression) I will configure SNMP and Enable the service.
This can be found hidden away under ‘Configuration’ -> ‘Services -> System Settings’

Update Authorised network, and Trap destination and ‘APPLY’ to enable.

The System Service should now show the SNMP service as Online.

SNMP Test
If all OK, snmpget should return a Sun Storage string, this is required to allow us to use the HCC features which are limited to Oracle Exadata / storage platforms.
We can test this by logging into our Linux database server and typing snmpget -v1 -c public <IP address> Oracle MIB (Management Information Bases) and confirming the string returned is ‘Sun Storage 7000’
$ snmpget -v1 -c public 192.168.56.101 1.3.6.1.4.1.42.2.225.1.4.2.0
SNMPv2-SMI::enterprises.42.2.225.1.4.2.0 = STRING: "Sun Storage 7000"
Documentation
If required you can access the ZFS Storage Appliance documentation using by using the following URL https://<IP Address>:215/help/en/html/ZFSRC/index.html

Summary
In this post I have shared how to install the Oracle ZFS Appliance simulator for VirtualBox and configure the SNMP service and create an NFS a filesystem.
In my next post I will how we can use our Oracle ZFS Appliance simulator for an Oracle 19c database with (HCC) Hybrid Columnar Compression for training and educational purposes.
If you have access to VMware workstation or Fusion you may want to check out my Oracle ZFS Storage Simulator for VMware walkthrough.
[twitter-follow screen_name=’RonEkins’ show_count=’yes’]