

Background
I have seen several great Linux install guides for Oracle’s free VirtualBox but have never come across a version specifically for VMware Fusion, so here goes lets’s put that right.
What is VMware Fusion ?
VMware Fusion is a sofware hypervisor for Mac OS X , it’s VMware’s Mac equivalent of VMware Workstation for Windows and Linux.
Please note these are licenceable products unlike VirtualBox, so you will need to either start a free trial of buy a licence before you use VMware Fusion.
VMware Fusion provides support for big VM’s and some useful integration between your Mac and Windows VM’s. If your a PC user you may have also come across VMware Workstation Player , this is free for personal use and is avaible for both Windows and Linux, Workstation Player is able to run VM’s created with either VMware Workstation Pro or VMware Fusion Pro and is a great way of sharing restricted or expiring VM’s, unfortantely there is no Mac OS X version as of yet.
Parallels Desktop is another widley used virtualisation product on the Mac, Parallels Desktop Pro now includes direct support for Docker, Vagrant, Chef and Jenkins so that may provide a source of intresting future Blog.
VMware Fusion
Ok, lets kick this off by starting VMware Fusion.

Navigate to ‘File’ and select ‘New’
Click ‘Continue’ to use a previoulsy downloaded image.

Select the required ISO, if you have previoulsy used an image Fusion will show it otherwise you will need to navigate to it.

Click ‘Customize Settings’ to allow you to change the defaults.

Give your Virtual Machine a file name ‘Save As’

You can now change the initial VM configuration e.g. add additional Network Interfaces, Hard Disks and chnage memory and processor sizes.
Select ‘Processors & Memory’
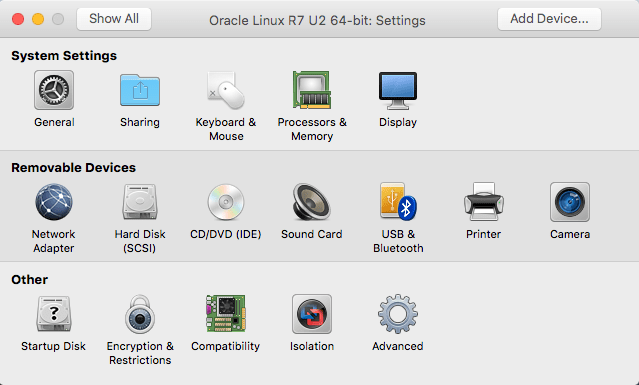
In this example I have increased the Memory to 4GB from 1GB and changed the Processor core count. Once complet click ‘Show All’ to return to the main configuration screen.

Select ‘Hard Disk (SCSI’), here you can add additional devices these will be presented as /dev/sdb, /dev/sdc, /dev/sdd etc… Here I have upped the /dev/sda from 20GB to 40GB.

Use ‘Show All’ to return and click the large play button to launch the Oracle Linux installer.
Oracle Linux 7.2 Installer
Click hit ‘I’ to start the install ant the Oracle Linux 7.2 splash screen.

Select language, here I have selected ‘English (United Kingdom)’ this automatically updates the keyboard, timezone and other regional settings.

Installation Summary
The ‘Installation Summary’ guide you through the install requiring the completion of items maked with an exclamation mark before allowing you to proceed.

Installation Destination
Ok, lets confirm our ‘Installation Destination’
Here we can see out VMware 40GB Virtual Disk we allocated earlier, click ‘Done’ to let the installer use the whole disk.

Software Selection
As you can see below my keyboard has changed to ‘gb’, now lets select our packages.
Base Enviroment
- Server with GUI
Add-Ons for Selected Enviroment
- Compatibility Libraries
- Development Tools

Create User
We now need to set the ‘Root’ password create out first user account, select ‘Make this user administrator’


Once the installer is complete click ‘Reboot’ when prompted and accept the licence.
You will now be able to logon using the user account just created, accept language and input sources. You will be offered the chance to configure Cloud storage, click next and your ready to start configuring and using your new Linux 7.2 environment.
Next steps should include, configure network, firewall, yum updates, additional packages and user accounts etc..
[twitter-follow screen_name=’RonEkins’ show_count=’yes’]
Leave a Reply