OGB Appreciation Day: People and Firsts

It’s that time of year where the Oracle community reflects on the year and thanks the Oracle ACE program and everyone from else from Oracle involved for their personal involvement and contributions.

Tim Hall kicked off this great initiative back in 2016 under the OTN (Oracle Technology Network) banner and this was repeated again in 2017/2018 under the ODC (Oracle Developer Community) moniker.

This year Tim started the OGB (Oracle GroundBreakers) Appreciation Day and for me I would like to celebrate the people and opportunities the Oracle ACE programmes provides.

This year I had a number of firsts, presenting on the unique Norwegian User Group cruise, presenting at the Bulgarian Oracle User Group, and a major highlight was attending the Oracle ACE Directors briefing prior to OOW (Oracle Open World).

Looking forward to hopefully some new firsts in 2020 #ThanksOGB

[twitter-follow screen_name=’RonEkins’ show_count=’yes’]

Oracle VM 3.4.6 : Part 3 – OVM Networks

Configuring OVM Networks

Before we can present our iSCSI and NFS storage to our Oracle VM Server we need to configure a network. Oracle VM Manager provides a simple to use interface which can maintain the /etc/sysconfig/networking-scripts without the need of manual editing.

In my lab I have a number of VLAN’s configure on an Arista switch, in this Blog I will using an iSCSI VLAN and my NFS VLAN.

Logon to Oracle VM Manager and select the Networking Tab, then VLAN Interfaces.


Drill down to your OVM server, is this example mine is called z-ovm, here you will be presented with a list of available network interfaces on your selected server. Select your interface and click Next.

Create VLAN

Add your VLAN ID and click Next.

Change Addressing to Static and enter IP Address and Netmask, click Finish to Configure IP Address.

Now navigate to the Networks tab and click the green + to Create a Network entry.

Create Network

In the Blog we will create 2 Network’s one for NFS and the other for iSCSI, enter Name, Description and select Network Uses e.g Storage

As we have already configure a VLAN we can click Next, and go straight to Select VLAN Interfaces.

Select available VLAN and click Next.

Now it click Finish to complete setup.

We can now see our new NFS storage network. 

I repeated the above steps for my iSCSI VLAN and network.

You can validate and review your check network configuration changes by logging to your OVM sever and navigating to the network-scripts directory e.g. 

[root@z-ovm ~]# cd /etc/sysconfig/network-scripts/
[root@z-ovm network-scripts]# 

From here we can see the network files have been updated by Oracle VM Manager and configured to use our VLAN’s

[root@z-ovm network-scripts]# cat ifcfg-eth1.3
#This file was dynamically created by Oracle VM Manager. Please do not edit
DEVICE=eth1.3
HWADDR=EC:F4:BB:C7:9B:F2
BOOTPROTO=static
IPADDR=192.168.2.43
NETMASK=255.255.255.0
ONBOOT=yes
VLAN=yes
[root@z-ovm network-scripts]# ifconfig eth1.3
eth1.3    Link encap:Ethernet  HWaddr EC:F4:BB:C7:9B:F2  
          inet addr:192.168.2.43  Bcast:192.168.2.255  Mask:255.255.255.0
          UP BROADCAST RUNNING MULTICAST  MTU:1500  Metric:1
          RX packets:1777 errors:0 dropped:31 overruns:0 frame:0
          TX packets:8 errors:0 dropped:0 overruns:0 carrier:0
          collisions:0 txqueuelen:0 
          RX bytes:93802 (91.6 KiB)  TX bytes:672 (672.0 b)

[twitter-follow screen_name=’RonEkins’ show_count=’yes’]

Adding new devices (VMware) to Linux without re-booting server


Background

Today, I found myself needing to add 3 new disks to one of my Oracle database server VMware VM’s, unfortunately I was unable to re-boot the server so I followed the steps below to add the new devices.

Create LUN’s using your storage platform and add add them to your Virtual Machine using your preferred  vSphere Client.

newDevices
VMware vSphere Web Client – 3 new devices highlighted

Use yum to install sg3_utils

[root@z-oracle1 ~]# yum install sg3_utils

Use the Linux ‘fdisk’ command to list current devices

[root@z-oracle1 dev]# fdisk -l

Rescan SCSI bus using the rescan-sci-bus.sh script.

[root@z-oracle1 dev]# rescan-scsi-bus.sh
Scanning SCSI subsystem for new devices
Scanning host 0 for SCSI target IDs 0 1 2 3 4 5 6 7, all LUNs
Scanning for device 0 0 0 0 …
OLD: Host: scsi0 Channel: 00 Id: 00 Lun: 00
Vendor: NECVMWar Model: VMware IDE CDR00 Rev: 1.00
Type: CD-ROM ANSI SCSI revision: 05
Scanning host 1 for SCSI target IDs 0 1 2 3 4 5 6 7, all LUNs
Scanning host 2 for SCSI target IDs 0 1 2 3 4 5 6 7, all LUNs
Scanning for device 2 0 0 0 …
OLD: Host: scsi2 Channel: 00 Id: 00 Lun: 00
Vendor: VMware Model: Virtual disk Rev: 1.0
Type: Direct-Access ANSI SCSI revision: 02
Scanning for device 2 0 1 0 …

Use ‘fdisk’ to identify new device names

[root@z-oracle1 dev]# fdisk -l

Disk /dev/sdi: 1099.5 GB, 1099511627776 bytes, 2147483648 sectors
Units = sectors of 1 * 512 = 512 bytes
Sector size (logical/physical): 512 bytes / 512 bytes
I/O size (minimum/optimal): 512 bytes / 4194304 bytes

Disk /dev/sdj: 3298.5 GB, 3298534883328 bytes, 6442450944 sectors
Units = sectors of 1 * 512 = 512 bytes
Sector size (logical/physical): 512 bytes / 512 bytes
I/O size (minimum/optimal): 512 bytes / 4194304 bytes

Disk /dev/sdk: 1099.5 GB, 1099511627776 bytes, 2147483648 sectors
Units = sectors of 1 * 512 = 512 bytes
Sector size (logical/physical): 512 bytes / 512 bytes
I/O size (minimum/optimal): 512 bytes / 4194304 bytes

We should now be able to see the device in /dev.

[root@z-oracle1 dev]# ls -l /dev/sd*
brw-rw—-. 1 root disk 8, 0 May 14 14:14 /dev/sda
brw-rw—-. 1 root disk 8, 1 May 14 14:14 /dev/sda1
brw-rw—-. 1 root disk 8, 2 May 14 14:14 /dev/sda2
brw-rw—-. 1 root disk 8, 16 May 14 14:14 /dev/sdb
brw-rw—-. 1 root disk 8, 32 Jul 23 14:31 /dev/sdc
brw-rw—-. 1 root disk 8, 48 Jul 23 14:30 /dev/sdd
brw-rw—-. 1 root disk 8, 64 Jul 23 14:31 /dev/sde
brw-rw—-. 1 root disk 8, 80 Jul 9 21:02 /dev/sdf
brw-rw—-. 1 root disk 8, 96 Jul 9 21:02 /dev/sdg
brw-rw—-. 1 root disk 8, 112 Jul 9 21:02 /dev/sdh
brw-rw—-. 1 root disk 8, 128 Jul 24 10:46 /dev/sdi
brw-rw—-. 1 root disk 8, 144 Jul 24 10:46 /dev/sdj
brw-rw—-. 1 root disk 8, 160 Jul 24 10:46 /dev/sdk

We are now ready to partition our new disks using ‘fdisk’ (n = new p = print w = write).

[root@z-oracle1 dev]# fdisk /dev/sdi
Welcome to fdisk (util-linux 2.23.2).

Changes will remain in memory only, until you decide to write them.
Be careful before using the write command.

Device does not contain a recognized partition table
Building a new DOS disklabel with disk identifier 0x1fea2f04.

Command (m for help): n
Partition type:
p primary (0 primary, 0 extended, 4 free)
e extended
Select (default p):
Using default response p
Partition number (1-4, default 1):
First sector (8192-2147483647, default 8192):
Using default value 8192
Last sector, +sectors or +size{K,M,G} (8192-2147483647, default 2147483647):
Using default value 2147483647
Partition 1 of type Linux and of size 1024 GiB is set

Command (m for help): p

Disk /dev/sdi: 1099.5 GB, 1099511627776 bytes, 2147483648 sectors
Units = sectors of 1 * 512 = 512 bytes
Sector size (logical/physical): 512 bytes / 512 bytes
I/O size (minimum/optimal): 512 bytes / 4194304 bytes
Disk label type: dos
Disk identifier: 0x1fea2f04

Device Boot Start End Blocks Id System
/dev/sdi1 8192 2147483647 1073737728 83 Linux
Command (m for help): w
The partition table has been altered!

Calling ioctl() to re-read partition table.
Syncing disks.

I then repeated for ‘/dev/sdj’ & ‘/dev/sdk’ and now ready to format the devices e.g. mkfs.ext4 /dev/sdi

[twitter-follow screen_name=’RonEkins’ show_count=’yes’]

Oracle Database Automation with Ansible AWX

In the video below I demonstrate how a simple Ansible playbook can be used to automate the cloning of multiple Oracle databases in parallel.

In the demo I use the AWX Web UI to run the playbook, the AWX project is an Open Source community project sponsored by RedHat, it can be considered the ‘bleed-in edge’ of RedHat Ansible Tower.

AWX is designed to be fast moving and is where the development takes place before being hardened and making it’s way into the enterprise ready RedHat supported Ansible Tower solution.

AWX is great from lab work, but for all Production workloads I would strongly recommend that Ansible Tower is considered.

Pure Code Developer Community

Visit the Pure Code Developer Community and click on the ‘Ansible Playbook Examples’ card to be directed to the public GitHub repository, you will find this and other Oracle playbook examples.

[twitter-follow screen_name=’RonEkins’ show_count=’yes’]

Getting started with Ansible and Windows

Background

I spend most of my time working with Linux but occasionally I come across Oracle on Windows, so I thought it’s about time that I tried my hand at using Ansible on Windows.

Ansible on Windows

You can not currently run Ansible on Windows, but you can manage Windows servers from a Linux or Mac Ansible control machine.

Ansible uses ‘SSH’ to manage Linux servers, on Windows Ansible requires ‘winRM’ Windows Remote Manager services. The Ansible docs details prerequisites, which include PowerShell v3 and .Net 4.0 and winRM, the steps to set-up winRM can be found here.

If you read my previous Blog Post Getting started with Ansible and Oracle you will have seen me use ‘ping’ to check connectivity to a Linux server, to do this in a Windows environment we use ‘win_ping’ module via the -m option.

win-ping
You can see that the Ansible ‘ping’ and ‘win_ping’ both return the familiar ‘pong’ message, indicating good connectivity.

Ok, that’s pretty cool, now let’s try running the Windows ‘whoami.exe’ using the ‘win_command’ module.

win-whoami
And a quick ‘Hello World’ test via PowerShell and the ‘win_shell’ module.

HelloWorld

Next steps, create some Windows playbooks and test, but that’s for another Blog.

[twitter-follow screen_name=’RonEkins’ show_count=’yes’]

Getting started with the Oracle ZFS Storage VMware Simulator (Part II)

In this Blog post I will share how your newly created Oracle ZFS Storage VMware Simulator can be used to deliver storage for an Oracle 12c database via dNFS and also support HCC (Hybrid Columnar Compression).

Hopefully you have followed Part I of my Blog post on Getting Started with the Oracle ZFS Storage VMware Simulator and already have a working Virtual Machine, if not probably a good time to visit Part I and try to build the simulator.

Oracle dNFS

If you have not set-up or used Oracle dNFS before, you may want to check-out a couple of my previous posts on Oracle dNFS, Using Oracle dNFS Multi-Path and also Oracle dNFS Throughput Testing as these provide some useful background and some additional information.

On my Oracle 12c Linux database server I have created an a directory for the mount point and an oranfstab file in $ORACLE_HOM/dbs thus:

server: zfsa

local: 192.168.56.10  path: 172.16.148.133

nfs_version: nfsv3

export: /export/oradata   mount: /u02/app/oracle/oradata

$ORACLE_HOME/dbs/oranfstab

The parameters used in my oranfstab are described below:

server

The NFS server name, this can be anything and is used for information rather than any network lookups.

local

Up to four paths on the database host, specified by IP address or by name.

path

Up to four network paths to the NFS server, specified either by IP address, or by name.

export

The exported path from the NFS server.

mount

The corresponding local mount point for the exported volume.

nfs_version

Specifies the NFS protocol version used by Direct NFS Client. Possible values are NFSv3NFSv4NFSv4.1, and pNFS. The default version is NFSv3. If you select NFSv4.x, then you must configure the value in oranfstab for nfs_version. Specify nfs_version as pNFS, if you want to use Direct NFS with Parallel NFS.

Verify Oracle dNFS Usage

Restart your Oracle 12c database and view the Oracle Alert file, if you have successfully  configured your environment you should see that Oracle is reporting that the Oracle dNFS library is in use as it’s version.

Oracle instance running with ODM: Oracle Direct NFS ODM Library Version 4.0

If you are not seeing any reference to the use of Oracle Direct NFS you may need to enable it using the steps detailed here.

We should also be able to see that we are using a single channel, IP addresses and the optional server name from our oranfstab.

Direct NFS: channel id [0] path [172.16.148.133] to filer [zfsa] via local [192.168.56.10] is UP

From the alert log file we can also confirm thatOracle is using our oranfstab file rather than the /etc/mtab, if your oranfstab is not correct your will see defined in mtab rather than defined in oranfstab, time to go back and fix-it.

Direct NFS: attempting to mount /export/oradata on filer zfsa defined in oranfstab

Additionaly, you can query the database using the v$dnfs_servers view to confirm the configuration.

SQL> COLUMN svrname FORMAT A20

SQL> COLUMN dirname FORMAT A50

SQL> SELECT svrname, dirname, nfsversion FROM v$dnfs_servers;

SVRNAME  DIRNAME           NFSVERSION

————— ———————-     ———-

zfsa            /export/oradata NFSv3.0

SNMP (Simple Network Management Protocol)

Finally, before we can start to use Oracle HCC (Hybrid Columnar Compression) within our Oracle 12c database we need to check that our simulator has been configured to use SNMP.

From our Oracle ZFS Storage VMware simulator check the status of services.

SNMP3

And if green, use snmpget to check the response from our simulator, providing the IP address and the Oracle MIB (Management Information Bases) below.

snmpget -v1 -c public 172.16.148.133 1.3.6.1.4.1.42.2.225.1.4.2.0

If all OK, snmpget should return a Sun Storage string, this is required to allow us to use the HCC features which are limited to Oracle Exadata / storage platforms.

SNMPv2-SMI::enterprises.42.2.225.1.4.2.0 = STRING: “Sun Storage 7000”

If you have successfully built your simulator and configured your Oracle 12c environment you are now ready to try to try out some of the HCC features.

In the next Blog post we will attempt to create database objects within and outside of our Oracle ZFS Storage VMware simulator to check our Oracle 12c database is able to use HCC data.

[twitter-follow screen_name=’RonEkins’ show_count=’yes’]

Oracle 12c Multi-database refresh with Ansible

In this Blog post I will share another short video demonstrating how storage data services can be used to perform many common data management tasks using simply scripting, DevOPS automation tools and Pure Storage REST API’s .

Oracle 12c multiple databases clones with Ansible

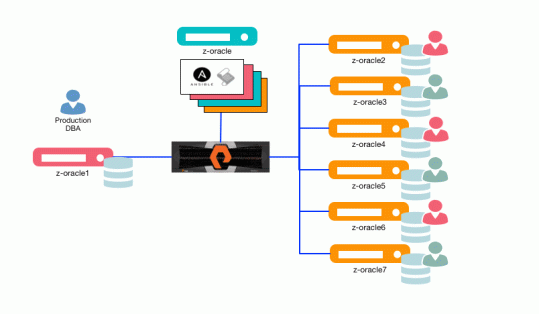
Before we jump into the demonstration let me detail my architecture and explain what you are going to see, first the Architecture.

The Architecture

z-oracle will be used as my Ansible control machine
z-oracle1 is where my production Oracle 12c database is hosted
z-oracle2 thru to z-oracle7 are my development / test database servers.
FlashArray will be used to deliver the storage data services.Ansible_Demo

The Ansible Playbook

The database_clone Ansible playbook performs the following steps:

  1. Performs crash-consistent storage snapshot of production database using REST API.
    1. The storage snapshot is instant, has no impact to the running production database, and does not require any changes to production server or database configuration.

  2. Shutdown non-production database(s) and unmount database filesystems.
  3. Refresh non-production volume(s) from latest storage snapshot.
  4. Mount database filesystems and start database(s).
    1. At this point the non-production database(s) are exact copies of the production database with the same name as production but consuming no space.

  5. Rename non-Production database, datafiles and directories.

If you have watched the video you will have seen that the 6 non-production databases have all been refreshed from production in less than 2 1/2 minutes from a single Ansible playbook.

Visit code.purestorage.com to see more Ansible examples and also find examples for other DevOPs tools and languages including Python, PowerShell, Puppet…

[twitter-follow screen_name=’RonEkins’ show_count=’yes’]

Part 3: Oracle 12c Point-in-Time-Recovery

In this Blog post I will share another short video demonstrating how storage data services can be used to perform many common data management and CDM (Copy Data Management) tasks using simply scripting, DevOPS automation tools and Pure Storage REST API’s .

Oracle 12c Point-in-Time-Recovery

This video starts the same as a Part 1: Oracle 12c database reset by refreshing an Oracle 12c database, and then simulates a typical development workflow process, where development databases are refreshed from production and then updated with:

  • New application configuration and setup
  • Additional synthetic and manufactured data supplement production data sets
  • Data masking and cleansing scripts.
  • Housekeeping routines e.g. clean-up workflow / staging tables

The video shows me taking a crash-consistent snapshot using a python script I have developed (available at code.purestorage.com) using the Pure Storage REST API’s.

The video then proceeds to perform further updates and changes, before simulating a the loss of datafile.

I then use another python script to determine the last snapshot before shutting the database down and rolling-back to the recovery point. Once the datafiles have been restored RMAN is used to roll-forward the database using the database log files performing a PITR (Point-in-Time-Recovery) with no data-loss.

[twitter-follow screen_name=’RonEkins’ show_count=’yes’]

Part 2: Oracle 12c database rewind

In this Blog post I will share another short video demonstrating how storage data services can be used to perform many common data management and CDM (Copy Data Management) tasks using simply scripting, DevOPS automation tools and Pure Storage REST API’s .

Oracle 12c database rewind

This video starts the same as a Part 1: Oracle 12c database reset by refreshing an Oracle 12c database, and then simulates a typical development workflow process, where development databases are refreshed from production and then updated with:

  • New application configuration and setup
  • Additional synthetic and manufactured data supplement production data sets
  • Data masking and cleansing scripts.
  • Housekeeping routines e.g. clean-up workflow / staging tables

The video shows me taking a crash-consistent snapshot using a python script I have developed (available at code.purestorage.com) using the Pure Storage REST API’s.

The video then proceeds to perform further updates and changes, before rewinding the database back to the last crash-consistent snapshot enabling rapid, iterative testing.

[twitter-follow screen_name=’RonEkins’ show_count=’yes’]

Part 1: Oracle 12c database reset

In this series of Blog posts I will share short videos demonstrating how storage data services can be used to perform many common data management and CDM (Copy Data Management) tasks using simply scripting, DevOPS automation tools and Pure Storage REST API’s .

Oracle 12c Database Reset

The video starts by refreshing an Oracle 12c database, and then simulates a typical development workflow process, where development databases are refreshed from production and then updated with:

  • New application configuration and setup
  • Additional synthetic and manufactured data supplement production data sets
  • Data masking and cleansing scripts.
  • Housekeeping routines e.g. clean-up workflow / staging tables

The video shows me taking a crash-consistent snapshot using a python script I have developed (available at code.purestorage.com) using the Pure Storage REST API’s.

The video then proceeds to perform further updates and changes, before resetting the database back to the initial clone simulating an application test issue due to problems with the initial set-up and configuration.

[twitter-follow screen_name=’RonEkins’ show_count=’yes’]

Create a website or blog at WordPress.com

Up ↑